We are all about decluttering your house and finding things to sell! Wondering how to price used items? Pricing anything you want to sell comes down to a simple, repeatable process: research recent sold prices for items just like yours, be brutally honest about its condition, and account for all the fees and shipping costs that will eat into your earnings. Get this right, and you’ll stop the guesswork and finally make progress turning your old stuff into real cash. In the article we are talking about how to price your used items and then use DeClutter now to easily list them on eBay.
Why Smart Pricing Turns Clutter Paralysis Into Profit

Let’s be real for a second. You stare at that pile of stuff—those boxes sitting in the garage for years, the clothes you haven’t worn since last season—and the sheer thought of figuring out what it’s all worth is just… exhausting. That’s not laziness; it’s clutter paralysis. It’s that feeling of being so paralyzed by decisions that you don’t even start.
This guide is designed to break that cycle. Learning how to put a price on your used items is the first, most powerful step you can take. It builds momentum and flips a dreaded chore into an exciting challenge.
The Booming Secondhand Opportunity
You’re not just clearing out some space; you’re stepping into a massive, rapidly growing market. The global secondhand market has already hit an astonishing USD 652.7 billion and is projected to climb by 13.5% every year. What’s fueling this? People are tired of high prices for new goods, with nearly 70% of shoppers worldwide now choosing pre-owned items instead.
For sellers who learn to price things correctly, this is a huge opportunity. You can join the 54% of Americans who are already selling their used goods for a profit. If you want to dive deeper, you can discover more insights about the secondhand market’s growth and what it means for people just like you.
This isn’t about getting everything perfect from the start. It’s about progress. Once you learn a few simple pricing strategies, you can turn that pile of “I’ll get to it someday” into actual results: a cleaner home and a fatter wallet.
The goal isn’t just to get rid of things. It’s to build momentum. A single successful sale, driven by a smart price, can provide the quick win—that dopamine hit—you need to tackle the next item, and the next. That’s how you turn clutter paralysis into progress.
So, where do we start? Not with complicated spreadsheets or confusing formulas. We start with a straightforward plan to figure out what you have, find its real market value, and list it with confidence. Let’s turn that pile of indecision into a source of income.
How to Honestly Grade Your Items to Build Trust
Before you can slap a price tag on something, you’ve got to get real about what you’re actually selling. This is the part where that “clutter paralysis” can creep back in. I remember feeling paralyzed every time I looked at a box of my old stuff, second-guessing every tiny scuff until I just gave up and put it back.
Let’s cut through that. The goal here isn’t perfection; it’s making progress. Being completely honest about an item’s condition builds instant trust with buyers. That trust translates into faster sales, fewer returns, and a seller reputation that does the work for you. This is a quick win that creates the momentum to keep you going.
From New to Needs Work: A Simple Grading Scale
Forget about creating some overly complicated, 10-point inspection system. Buyers get it. They understand simple, clear terms, and using the same ones for all your listings makes your life easier and their decision-making process faster.
Here are the five core conditions you’ll probably use over and over again:
- New with Tags (NWT): Simple. The item is brand new, never used, and the original retail tags are still hanging on. It’s exactly as it was on the store shelf.
- New without Tags (NWOT): It’s new and unused, but the tags are gone. Maybe you snipped them off thinking you’d wear it, but it never left the closet.
- Excellent Used Condition (EUC): This is for items that have been used, but you’d have to be a detective to find any signs of wear. It’s close to new, with no stains, rips, or real flaws to speak of.
- Good Used Condition (GUC): This is the workhorse category. The item shows normal, gentle wear from being used as intended. Think minor fading, a tiny bit of pilling on a sweater, or light scuffs on a shoe. Any small flaws must be pointed out.
- Fair/As-Is: Here’s where you list items with noticeable issues—stains, tears, missing pieces, or things that don’t work right. These are often sold for parts, upcycling projects, or to handy buyers who don’t mind a little repair work.
Figuring out which bucket your item falls into is half the battle. Now, you need to prove it.
Here’s a quick cheat sheet I use to keep my own grading consistent. It helps take the guesswork out of the process.
| Grade | Description | Typical Pricing Adjustment |
|---|---|---|
| NWT | Brand new, unused, with original tags. Pristine. | 80-100% of new comparable sales |
| NWOT | New and unused, but tags are removed. No signs of wear. | 70-90% of new comparable sales |
| EUC | Gently used with almost no visible signs of wear. | 50-70% of new comparable sales |
| GUC | Shows light, normal wear like minor fading or pilling. | 30-50% of new comparable sales |
| Fair/As-Is | Visible flaws (stains, tears, damage). Fully disclosed. | 10-30% of new comparable sales |
Using a consistent scale like this not only helps you price things fairly but also manages buyer expectations right from the start.
The Art of Spotting and Disclosing Flaws
Your gut reaction might be to downplay a flaw, but trust me on this: being upfront is your single best sales tactic. A buyer who knows about a small scratch before they click “buy” is a happy customer. A buyer who discovers it themselves is a potential return and a guaranteed negative review.
The most successful sellers don’t just sell products; they sell confidence. By pointing out flaws yourself, you control the narrative and prove you’re a trustworthy person to buy from. This transparency often justifies your price more than a “perfect” item with vague details.
Grab your item and get it under a bright light. Seriously, good lighting is non-negotiable. Look for these common culprits:
- Clothing: Check the usual suspects—armpits, collars, and cuffs for stains. Look for rips, missing buttons, broken zippers, pilling, and fading.
- Electronics: Scratches on the screen or body, dead pixels, sticky or non-working buttons, and poor battery life. Don’t forget to mention if the original charger or accessories are missing.
- Furniture: Dents, deep scratches, water rings, stains or tears in the upholstery, and wobbly legs.
- Books & Media: Torn pages or covers, writing or highlighting inside, cracked jewel cases, or scratched discs that might cause skipping.
When you find something, don’t just write it down—show it. Take a clear, close-up photo. Get specific in your description. Instead of a vague “shows some wear,” say “Small 1-inch scratch on the back left corner, as shown in photo #4.” That level of detail erases all doubt and helps a serious buyer pull the trigger.
Finding Your Price with Real-World Research
Throwing a random price on an item is a fast track to frustration. If you aim too high, your listing will just sit there, collecting digital dust. Go too low, and you’re leaving money on the table. This is exactly where decision fatigue loves to creep in, making the whole thing feel like a monumental chore.
But it doesn’t have to be that way. Let’s forget gut feelings and use real-world data to find that pricing sweet spot with confidence.
The Secret Weapon: Sold Listings
If there’s one trick every seasoned reseller knows, it’s this: look at what items actually sold for, not what people are asking for them. An active listing price is just a wish. A sold listing is a fact. It’s proof that a real person, with a real wallet, was willing to pay that specific amount for that item in that condition.
Thankfully, most major platforms let you peek behind the curtain, though they don’t always make it obvious.
- On eBay: After searching for your item, just scroll down the filter menu on the left and check the box for “Sold Items.” The page will refresh to show you only completed sales.
- On Facebook Marketplace: It’s a similar move. Search for what you’re selling, tap “Filters,” and then toggle on “Sold Listings.”
That one simple click transforms your research from a guessing game into a data-driven decision. You’re now looking at the item’s true market value.
This process of inspecting, documenting, and grading is what allows you to find the right “comps” (comparable items) to measure your own against.
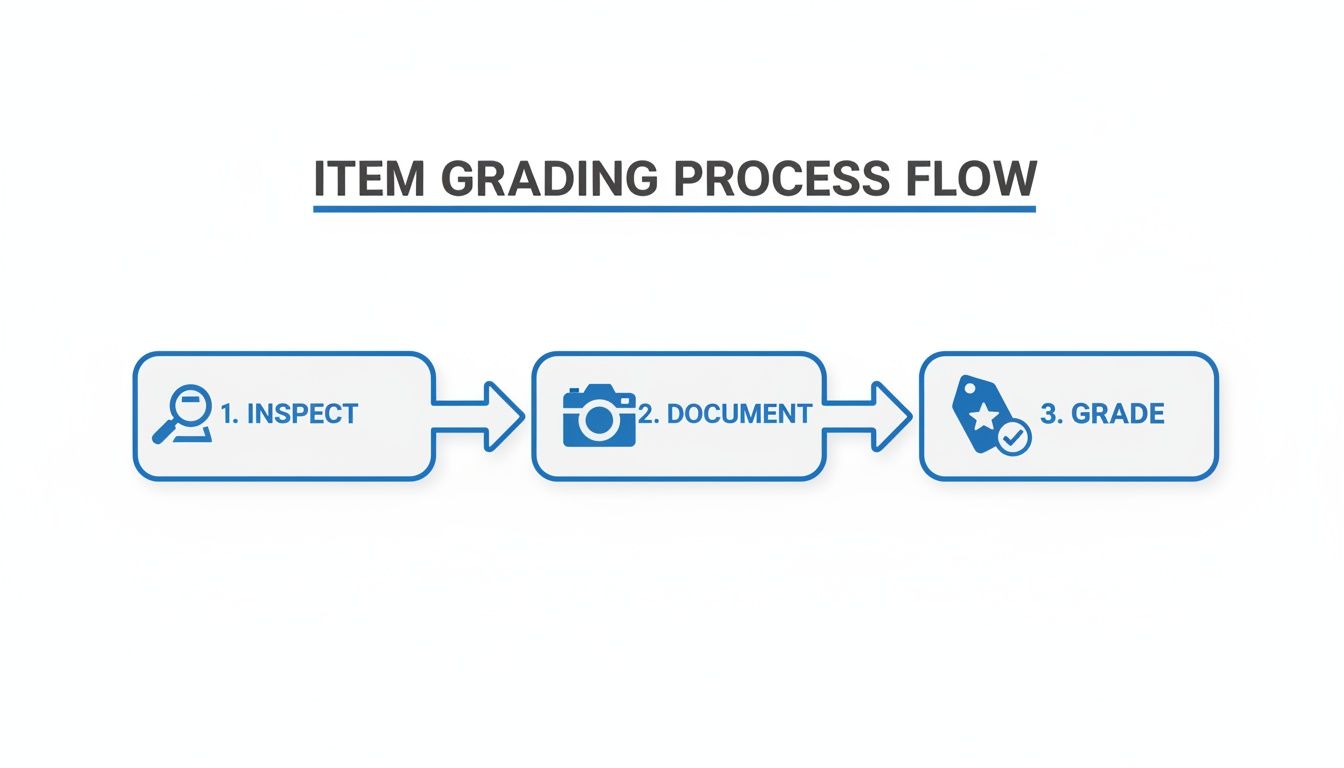
Running through this workflow means you’re not just guessing about the condition—you’re systematically evaluating it, which makes your final price much more defensible.
A Simple Formula for Confident Pricing
Once you’ve got a screen full of sold listings, the goal is to pinpoint your item’s pricing “neighborhood.” Over the years, I’ve found a straightforward formula that works for almost everything, from vintage t-shirts to old video game consoles.
- Find 5-10 “Comps”: Hunt down between five and ten recently sold items that are as close a match to yours as possible. Pay close attention to the brand, model, color, size, and—most critically—the condition.
- Toss Out the Extremes: Immediately ignore the highest and lowest prices. That one that sold for a wild amount probably had a rare, hidden feature, and the one that went for pennies was likely listed “for parts only.”
- Find the Average: Now, look at the cluster of prices in the middle. This range is your sweet spot. It’s what real buyers are consistently paying.
- Adjust for Your Item: Finally, hold your item up against the comps. Is yours in slightly better shape? Aim for the higher end of that middle range. Does it have a few more scuffs than the others? Price it at the lower end.
Takeaway: Your price isn’t just a number; it’s a story. Solid research tells a potential buyer, “This is a fair market price based on what others have recently paid for this exact item in this condition.” That confidence is contagious.
Making Research Work for You
The secondhand market is absolutely booming—a staggering 93% of Americans bought a used item last year. In a U.S. market now worth over $200 billion, smart pricing gives you a massive edge. In fact, platform data shows that undercutting comparable listings by a modest 10-15% can lead to a sale twice as fast. This is especially true right now, with 69% of people buying secondhand to navigate an uncertain economy. Getting your research right is your best tool for success. You can learn more about these recommerce trends and what they mean for sellers.
Let’s be honest, this research step can feel tedious, which is why so many people get stuck. It’s a classic case of decision fatigue. That’s precisely why we built AI-powered pricing guidance into the DeclutterNow app. It analyzes your item against current market data to suggest a competitive price range, doing the heavy lifting so you can break through the paralysis and just get it listed. For more ideas, you can also check out our guide on some of the best items to resell on eBay.
Getting Real About Fees and Shipping: What You Actually Keep
It’s an incredible feeling to see that “SOLD” notification pop up. But let’s be honest, the price the buyer pays is rarely what hits your bank account. I learned this the hard way after a few of my first sales, staring at my payout and wondering where all my profit went.
Ignoring the hidden costs of selling online is one of the fastest ways to get discouraged. You did all the work of finding, cleaning, and listing the item, and you deserve a return that makes it feel worthwhile. Let’s pull back the curtain on the numbers so you can price for what you’ll actually earn.
Unpacking the Most Common Seller Fees
Every online marketplace is a business, and they take a slice of the pie for connecting you with buyers. If you don’t plan for them, these fees can feel like a nasty surprise. While the exact percentages change from platform to platform, they usually fall into a few predictable buckets.
- Listing Fees: Some sites charge you a small flat fee just to post your item. It’s less common these days for most categories, but it’s always smart to double-check.
- Final Value Fees: This is the big one. It’s a percentage of the total sale price, which usually includes whatever the buyer paid for shipping. Expect this to be anywhere from 10% to 15% on most platforms.
- Payment Processing Fees: Companies like PayPal or the marketplace’s own payment system charge for securely handling the money. This is typically around 3% of the total amount plus a small fixed fee, like $0.30.
These little percentages add up fast. A great sale can suddenly feel mediocre if you haven’t factored them in. If you’re just getting started, our guide to selling unwanted items online has a great breakdown of what to expect on different sites.
Calculating Your True Take-Home Pay
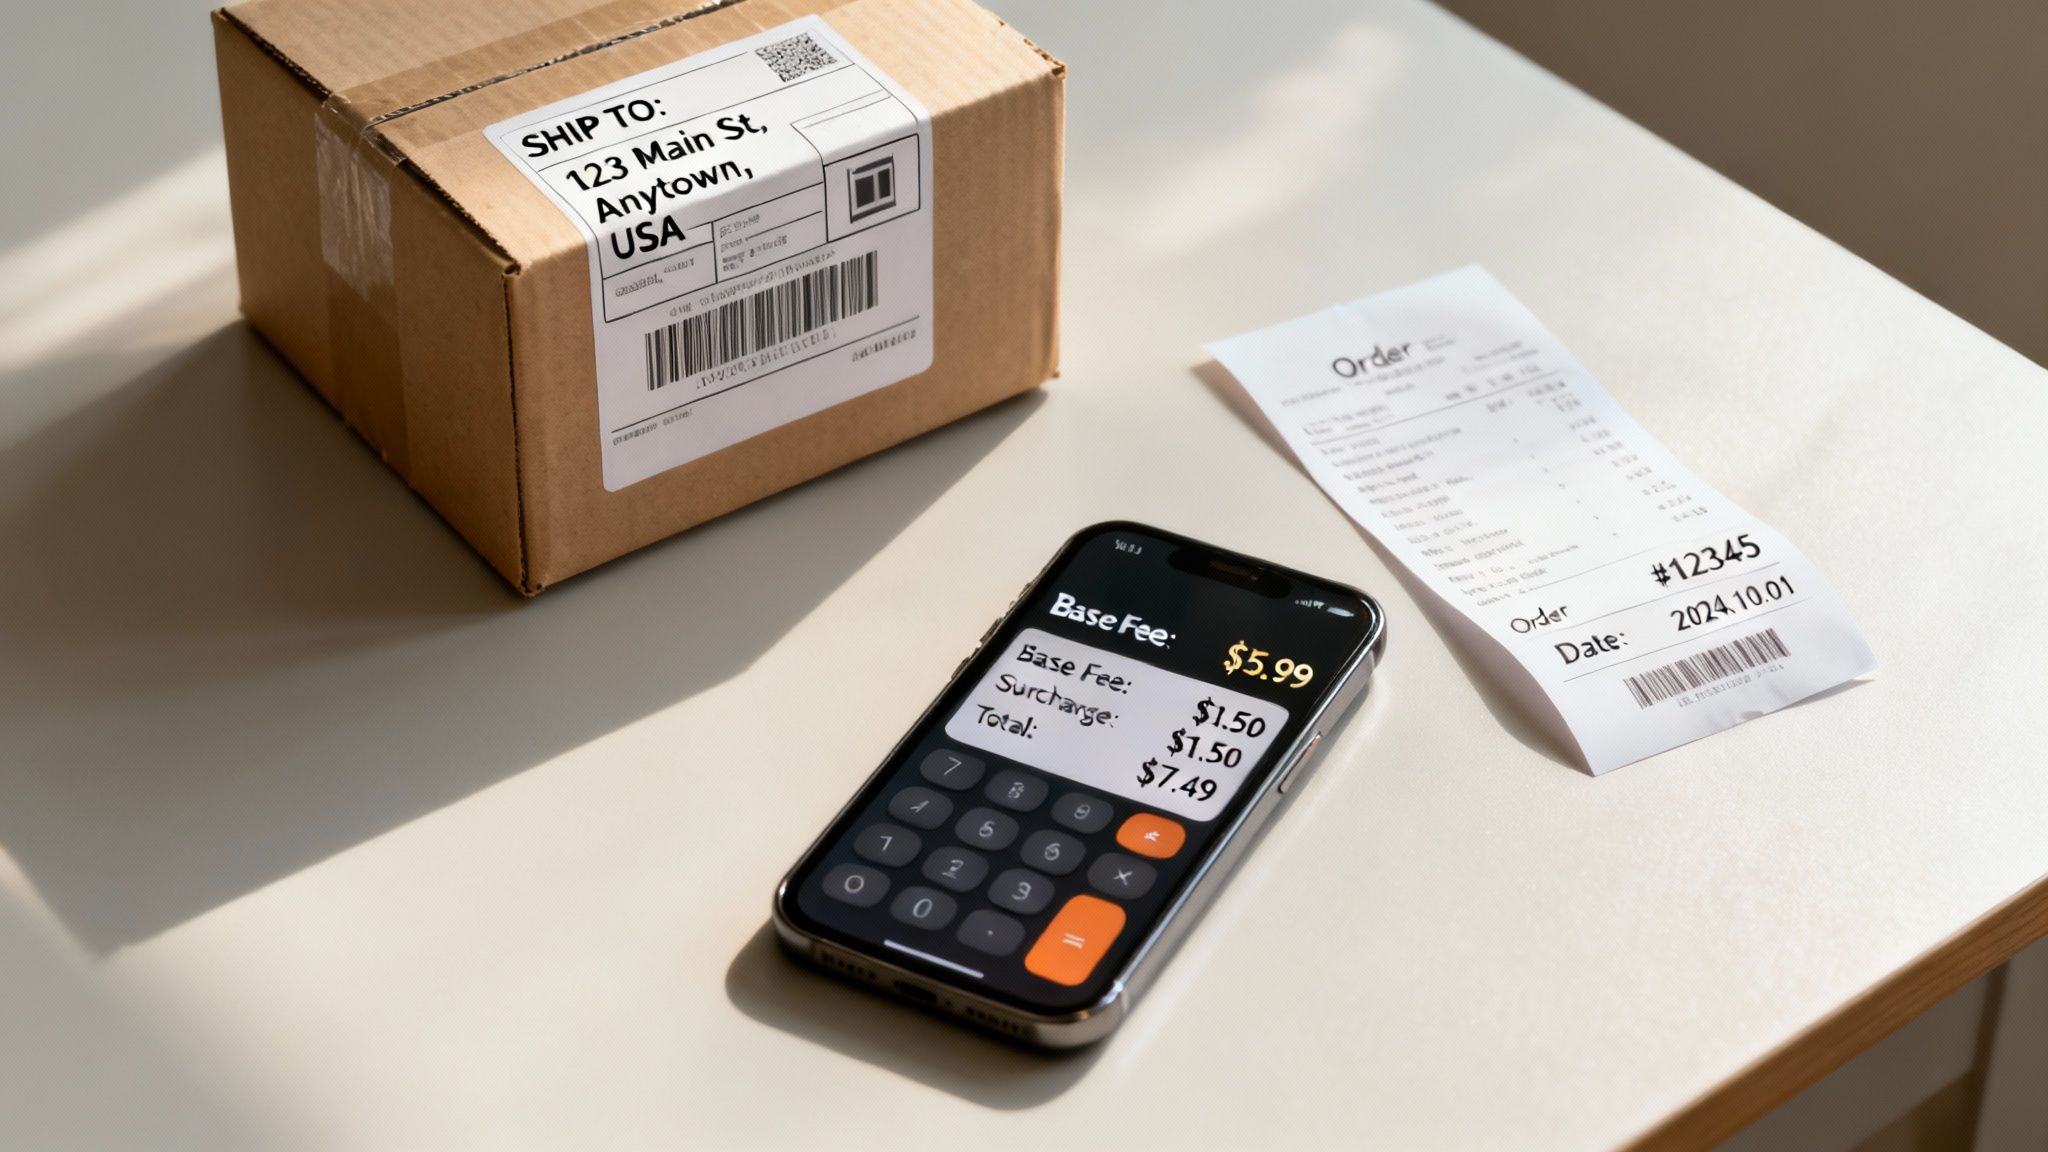
Let’s run the numbers on a real-world example. Say you sell a vintage jacket for $50, and the buyer pays an additional $10 for shipping.
Your total transaction amount is $60.
Now, let’s start subtracting the typical fees:
- Final Value Fee (13% of $60): -$7.80
- Payment Processing (3% of $60 + $0.30): -$2.10
- Your Actual Shipping Cost: -$9.00 (Let’s assume this was your cost to buy the label)
After all that, your actual take-home profit is $41.10. That’s a huge difference from the $50 list price. Knowing this before you list lets you set a price that still hits your profit goal.
Your real profit is the sale price minus platform fees, payment fees, and your actual shipping and material costs. Always calculate this before you list to avoid disappointment and stay motivated.
The Great Shipping Debate: Free vs. Paid
Right after the item price, your shipping strategy is the most critical decision. Do you bake the cost in and offer “free” shipping, or do you charge the buyer directly? There’s no single right answer—it depends entirely on what you’re selling.
Charge for Shipping When:
- The item is heavy or bulky. Think cast iron pans or a big winter coat. Shipping costs can vary wildly by location, and charging the actual cost protects you from losing your shirt on a cross-country sale.
- The item is low-cost. On a $10 item, a $5 shipping fee is a massive chunk of the total. Absorbing that cost for “free” shipping would likely wipe out your entire profit.
Offer “Free” Shipping When:
- The item is lightweight and small. If something costs less than $5 to ship, you can easily build that cost into your asking price. A $25 price with “free shipping” often feels more attractive to a buyer than “$20 + $5 shipping.”
- You’re in a highly competitive category. Take a look at similar listings. If all your top competitors are offering free shipping, you’ll probably have to do the same to even get noticed.
Thinking through these costs transforms pricing from a guess into a business decision. It’s the final, crucial step to make sure your selling efforts actually pay off.
Adapting Your Price for eBay vs. Facebook Marketplace
Where you decide to sell your stuff is just as important as how you price it. A price that would kick off a bidding war on eBay might get you nothing but crickets on Facebook Marketplace. To actually turn those boxes sitting in your garage into cash, you have to understand the unique vibe of each platform.
Here’s how I think about it: eBay is a massive, global department store, while Facebook Marketplace is your local neighborhood yard sale. Each one pulls in a different kind of shopper with totally different expectations. The real trick is learning how to tailor your approach to each.
The eBay Arena: Auction vs. Buy It Now
eBay gives you access to a huge audience, but you’ve got to play their game. Your two main tools here are the Auction and Buy It Now (BIN) formats.
- Use Auctions for: Those high-demand, rare, or collectible items where it’s tough to nail down the exact market value. We’re talking vintage band tees, retro video games, or signed memorabilia. Auctions create a sense of urgency and can spark bidding wars that drive the price way up.
- Use Buy It Now for: More common, everyday items where the going rate is pretty well-established. If you’re selling a specific model of a coffee maker, you can easily find what others sold for. Just set a competitive fixed price. I also recommend adding the “Best Offer” option—it signals you’re open to a little haggling.
Understanding the broader market helps, too. The secondhand economy is booming at over $200B, with online resale growing 13% every year. For benchmarks, I generally see furniture sell for 30-50% of its original price due to high local demand. Fast-moving electronics often go for 50-70% off, while clothing, which is everywhere, typically sells for 50-80% off MSRP.
My Two Cents: When I was just starting out, I’d run 7-day auctions on my most unique finds, starting them at just $0.99. It felt like a gamble, but it always attracted a ton of “watchers.” The final price almost always landed right where it should have. For more ideas, check out our guide on what sells fast on eBay.
Facebook Marketplace: The Art of the Local Deal
Facebook Marketplace is a completely different animal. It’s all local, things move fast, and pretty much everyone expects to negotiate. If you list an item at your absolute rock-bottom price, you’re just setting yourself up for frustration when the lowball offers inevitably roll in.
The secret? Price with negotiation in mind.
A good rule of thumb is to list your item for about 15-20% higher than the price you actually want. This builds in some wiggle room, so when someone offers you a little less, you can accept it and still hit your target. The buyer walks away feeling like they got a deal, and you get the price you wanted all along. It’s a win-win.
On visual-heavy platforms like these, your photos do half the selling for you. Understanding how to take better product photos is non-negotiable. Great pictures make your item look more valuable and can seriously cut down on the amount of haggling you’ll have to do.
Ultimately, learning to tweak your pricing for each platform is what separates casual declutterers from confident sellers. It’s all about meeting buyers where they are and speaking their language—whether that’s with a firm fixed price or a friendly negotiation.
What to Do When Your Items Just Aren’t Selling
We’ve all been there. You list something you were sure would be gone in a day, and then… nothing. A week goes by, then another. It’s that frustrating stall that can totally kill your momentum. I know that feeling—it can make you want to just put everything back in the box.
But don’t let it. This isn’t a sign of failure; it’s just a signal that a small tweak is needed. Instead of getting discouraged, let’s treat this as a quick troubleshooting mission to get your progress back on track.
The Two-Minute Listing Audit
When a listing goes cold, I find it’s almost always one of four culprits: the photos, the title, the description, or the price. Before you do anything else, take two minutes and look at your listing with a fresh, critical eye.
- Photos: Are they actually good? I mean bright, clear, and in focus? Did you show every important angle, especially any flaws you pointed out? Sometimes, just retaking the photos in better natural light is all it takes to make an item look ten times more appealing.
- Title & Description: Is your title loaded with keywords a real person would actually search for? Think brand, model, size, and color. Check your description—does it answer the obvious questions and paint an honest picture of the condition?
- Price: This is usually the big one. How does your price stack up against newly listed comparable items right now? The market moves fast, and a price that seemed right two weeks ago might be way off today.
Your Action Plan for Stalled Items
If your photos and description are genuinely solid, it’s time to get strategic about price and visibility. Here’s my go-to plan for turning a quiet listing into a sale.
First, give your listing a fresh start. Don’t just edit it—completely delete the old one and create it again from scratch. This simple trick bumps your item right back to the top of the search results on most platforms. It’s a powerful visibility boost, and it’s free. Think of it as a second grand opening.
If it still sits for another week or so after being relisted—maybe getting views but no serious offers—it’s time for a price adjustment. I find a 10-15% price drop is the sweet spot. It’s usually enough to get the attention of anyone “watching” your item and nudge them to finally make a move.
Sometimes, the best move is to change the game entirely. If an item flat-out refuses to sell online and you just need it gone, exploring other avenues can be a smart play. If you need to sell items quickly or understand their immediate cash value, investigating options like consulting with Pawn Brokers can provide a fast valuation.
Finally, don’t forget to use the tools the platform gives you. On eBay, send direct offers to watchers. On Poshmark, use the price drop feature to notify everyone who liked it. These tools are built specifically to break a stalemate and turn a passive browser into an active buyer. Use them.
A Few Lingering Questions on Pricing
Even with the best process, you’re bound to run into a few tricky situations that make you second-guess your pricing. That’s perfectly normal. Let’s tackle some of the most common pricing questions that pop up when you’re turning your old stuff into cash.
How Much Should I Knock Off for Minor Flaws?
My go-to rule of thumb is to find the going rate for the item in perfect condition, then take 10-20% off for a single, minor cosmetic issue—like a small, hard-to-see scratch. If you’ve got a few small dings or one more noticeable flaw, you’re probably looking at a 25-40% discount.
But here’s the real secret: the discount itself isn’t as important as being totally transparent about it. Call out the flaw in your description and, more importantly, show it clearly in your photos. Building that trust with a buyer gets things sold way faster than trying to hide an imperfection.
Should I Price High and Expect to Haggle?
This really comes down to where you’re selling. The platform’s culture dictates the strategy.
- On platforms like Facebook Marketplace or OfferUp, haggling is practically part of the fun. Pricing your item 15-20% higher than what you actually want for it is a solid move.
- For marketplaces like eBay (using ‘Buy It Now’) or Poshmark, a competitive, fair price right out of the gate is almost always the better approach. That said, enabling the ‘Best Offer’ feature is a fantastic way to signal you’re open to a conversation without scaring buyers away with an inflated starting price.
Is It Better to Sell as a Bundle or One by One?
This is a classic battle between your time and your potential profit. You have to decide which one is more valuable to you in the moment.
For lower-value, similar items like a stack of graphic tees, a full book series, or a pile of your kid’s outgrown clothes, bundling them into a ‘lot’ is a lifesaver. It’s just so much more efficient. But for anything high-value or unique, like a designer handbag or a collectible electronic, selling individually will nearly always bring in more money.
How Long Should I Wait Before Dropping the Price?
I usually give an item about 14-30 days. If you’re getting a ton of views but zero offers after two weeks, your price is almost certainly the culprit.
Before you slash the price, though, try a fresh start. Relist the item completely with brand-new photos and a keyword-rich title to give it a fresh boost in the algorithm. If it still sits for another week after that, a 10-15% price drop is a good next step. The whole point is to turn that feeling of being stuck into actual progress, and sometimes that means tweaking your strategy to keep things moving.
Feeling stuck on pricing is a classic symptom of clutter paralysis. The endless research and second-guessing can stop you before you even start. DeclutterNow breaks through that fatigue with AI-powered pricing guidance, helping you find a competitive price in seconds so you can finally make progress. Try DeclutterNow free and turn your overwhelm into action → https://app.declutternow.ai